If you’re pretty new to Kentico, you might be wondering how to create your own custom web part. This post will take you through the creation of a simple web part that provides links to social accounts, and will hopefully act as a foundation for you to go on to produce more complex web parts.
If you’ve built an ASP control before then you already know how to build a web part, as it is essentially a control that has an interface with the CMS, enabling you to pass values to it.
I’m going to set up a web part that has three editable links, one for a Twitter account, one for a Facebook account and one for a YouTube account. You will be able to change the link addresses and decide which links you want to include on the page. The final output to the page will look like this:

Write the control
First off, we’ll create the ASP code. Create a new file named SocialLinks.ascx. We will add three hyperlinks to this as in the code below:
<%@ Control Language="C#" Inherits="SocialLinks" CodeFile="SocialLinks.ascx.cs" AutoEventWireup="true" %>


<div class="SocialLinks">

  <h2><asp:Literal ID="Heading" runat="server" Text="Social links" /></h2>

  <asp:HyperLink ID="TwitterLink" runat="server" Text="Twitter" />

  <asp:HyperLink ID="FacebookLink" runat="server" Text="Facebook" />

  <asp:HyperLink ID="YouTubeLink" runat="server" Text="YouTube" />

</div>
For now, create an empty file for the code behind named SocialLinks.ascx.cs, we’ll add this code later as it might be easier to understand how this works once we have set up the web part in the Kentico CMS Site Manager.
Add to Kentico
Place the files on the server in the CMSWebParts folder, you may want to create a new folder here named ‘Custom’ to place these in. Open the CMS Site Manager and head to the Developer tab, then the Web parts section. Create a new category and give it a name, I’ll use ‘Custom’. Then select New web part and set the properties as below:
Display name: Social Links
Code name: SocialLinks (no spaces allowed here)
File name: ~/CMSWebParts/Custom/SocialLinks.ascx
Click OK and when the page reloads, enter a description for the web part.
Open the Properties tab, we will add the fields here that will be used to pass data to the web part. We want a new field for each social link and a field for the heading. Click the green plus button and add the settings below:
Column name: Heading
Attribute size: 200
Allow empty value: Yes
Field caption: Heading
Form control type: Input
Form control: Text box
Add three more fields using the same properties as above, but change the column name for each to TwitterLink, FacebookLink and YouTubeLink respectively, as well as the field caption. You could also set a default value to save having to enter new links in every time you add a new web part to a page template. It’s also helpful to add a field description for each, which appears when a user hovers over a label when configuring the web part.
We also need to add three checkbox inputs which will be used to hide certain links, use the settings below and create two others the same, changing the column names to HideFacebook and HideYouYube:
Column name: HideTwitter
Attribute type: Boolean (Yes/No)
Allow empty value: Yes
Field caption: Hide the Twitter link?
Form control type: Input
Form control: Check box
Handle the values in the code behind
So let’s set up the handling of the values that will be passed to the code behind file. Hopefully this should make more sense now that we have set the fields up for the web part. We can grab the data passed to the web part and place it into a variable: string twitter = (string)this.GetValue("TwitterLink");
Enter this code into the code behind file:
using CMS.PortalControls;

using System;

using System.Collections.Generic;

using System.Linq;

using System.Web;

using System.Web.UI;

using System.Web.UI.WebControls;

using CMS.GlobalHelper


public partial class SocialLinks : CMSAbstractWebPart

{

  protected void Page_Load(object sender, EventArgs e)

  {

    // Grab link values

    string heading = (string)this.GetValue("Heading");

    string twitter = (string)this.GetValue("TwitterLink");

    string facebook = (string)this.GetValue("FacebookLink");

    string youtube = (string)this.GetValue("YouTubeLink");


    // Set heading and hyperlinks

    Heading.Text = heading;

    TwitterLink.NavigateUrl = twitter;

    FacebookLink.NavigateUrl = facebook;

    YouTubeLink.NavigateUrl = youtube;


    // Grab checked values

    bool hidetwitter = ValidationHelper.GetBoolean(this.GetValue("HideTwitter"), false);

    bool hidefacebook = ValidationHelper.GetBoolean(this.GetValue("HideFacebook"), false);

    bool hideyoutube = ValidationHelper.GetBoolean(this.GetValue("HideYouTube"), false);


    // Hide links if checked

    if(hidetwitter){

      TwitterLink.Visible = false;

    }

    if(hidefacebook){

      FacebookLink.Visible = false;

    }

    if(hideyoutube){

      YouTubeLink.Visible = false;

    }

  }

}
Style with CSS
To make the links look a little nicer on the page, add the following CSS to give the appearance of buttons:
.SocialLinks a{

  display: block;

  padding: 3px 10px;

  background: #EAEAEA;

  background: linear-gradient(#FFFFFF, #EAEAEA);

  color: #666;

  border: 1px solid #ccc;

  margin-bottom: 3px;

  text-decoration: none;

}

.SocialLinks .twitter{

  border-left: 3px solid #32BBEF;

}

.SocialLinks .facebook{

  border-left: 3px solid #3B5998;

}

.SocialLinks .youtube{

  border-left: 3px solid #ff0000;

}
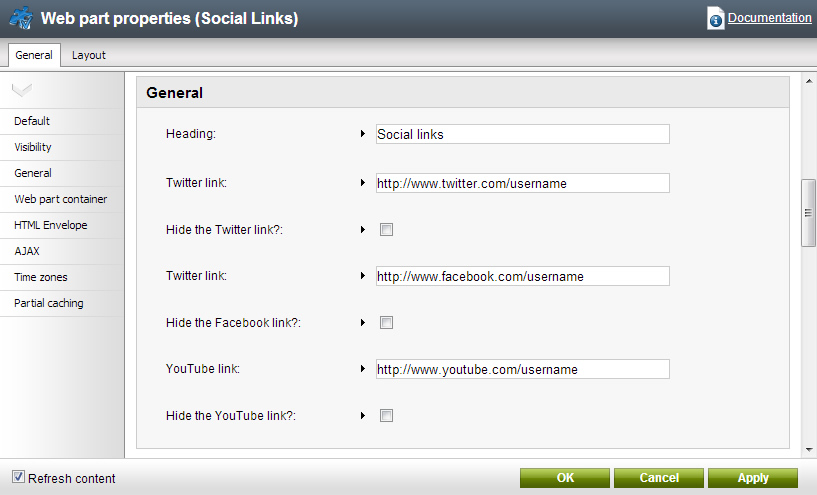
Ready to use
Now you can add the web part like you would any other, the fields we created will appear under the General section of the web part settings.